Friday, June 19, 2015

How to add SSL to a Web Application in SharePoint 2013

  • On the SharePoint – 80 site→ Edit Bindings
Step1SSL
  • In the Site Bindings dialogue, click Add → in the Type drop down, select https→ in the SSL Certificate drop down, select your cert.
Step2SSL
  • It should look like this when you’re done
Step3SSL
  • Next, on the SharePoint – 80 site, click on SSL settings
Step4SSL
  • Select the check box for Require SSL
Step5SSL
  • Launch the CA.  Go to Application Management → Alternate Access Mappings → Edit Public URLs
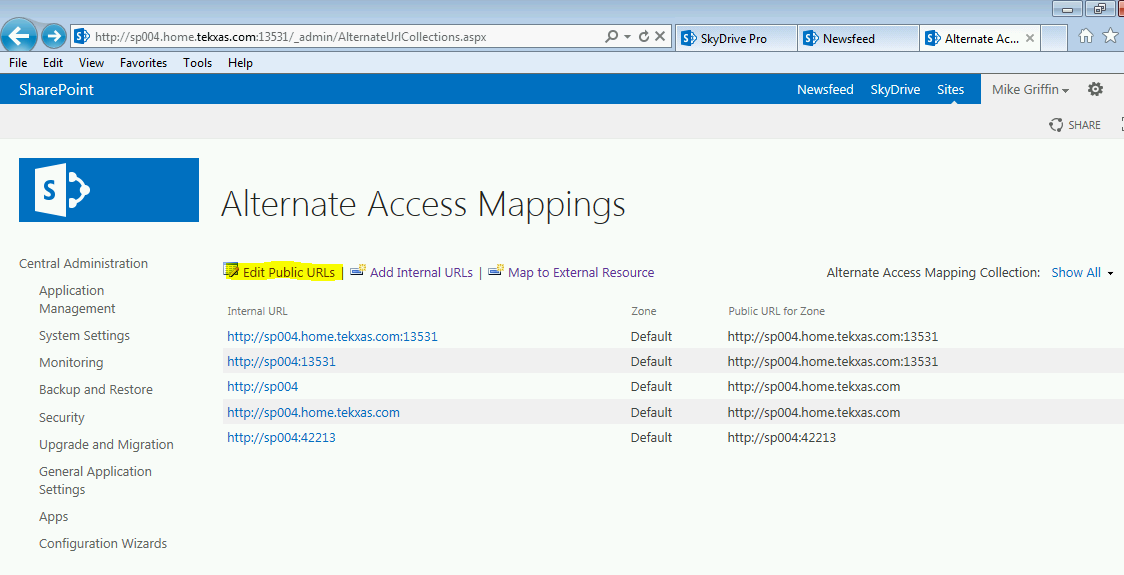
Step6SSL
  • Under Alternate Access Mapping Collection, select SharePoint – 80.
  • Change the Default to to the SSL site URL (e.g., https://servername.abc.com).  Make sure intranet, internet, custom and extranet are blank.  Click Save.
Step7SSL
  • Go back to the SharePoint Server and perform an IISReset
  • When IIS returns, launch the CA.  Remember, after an IISReset SharePoint sites, including the CA, take a minute to launch on the first time in
  • When the CA launches, click on General Application Settings → Farm Search Administration→ Search Service Application→ Content Sources →Local SharePoint sites → Under Start Addresses, change http://servername.abc.com to https://servername.home.tekxas.com.  Then run a full crawl.
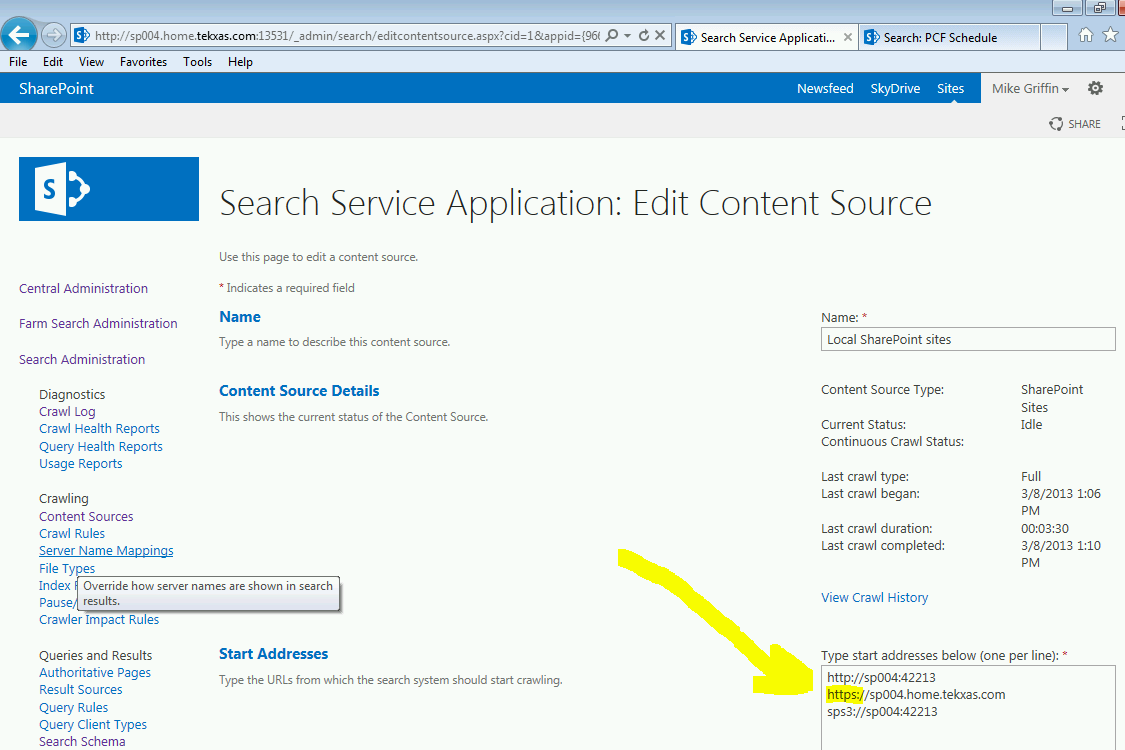
Step8SSL
That should do it.

Thursday, June 18, 2015

Configuring the Exchange Server 2013 AutoDiscover Internal URI

1. Use Get-ClientAccessServer to see the existing configuration
    In Exchange Powershell     
            Get-ClientAccessServer | Select Name,AutoDiscoverServiceInternalURI
2. To configure the new internal URI use Set-ClientAccessServer.
    In Exchange Powershell
            Get-ClientAccessServer | Set-ClientAccessServer -AutoDiscoverServiceInternalUri https://mail.exchange2013demo.com/Autodiscover/Autodiscover.xml

Thursday, July 10, 2014

Solve Exchange 2013 OWA and ECP page blank after login

  1. Logon to the correct back end server
  2. Open IIS manager (Start > Run > Inetmgr)
  3. Browse to the "Exchange Back End" website
  4. Click Bindings
  5. Mark the "https" binding (normally on port 444) and click Edit...
  6. Verify (or change to) the correct certificate
  7. Click OK
  8. Click Close
  9. Restart IIS on the server (IISRESET /noforce)

Tuesday, March 18, 2014

How to Create Certificates with a Longer Validity Period

1. In CA Server(Server name DC1), Add C:\Windows\CAPolicy.inf with following content, where [DC1] is NETBIOS name of CA server, and 10 is period of the certificate
[Version]
Signature=”$Windows NT$”


[DC1]
RenewalValidityPeriod=Years
RenewalValidityPeriodUnits=10
2. In Command Prompt, check the period, type following to check the certificate
   
   certutil -getreg ca\ValidityPeriod
   certutil -getreg ca\ValidityPeriodUnits


3. In Command Prompt,set the period, type following to change the period, where 10 is the periof of the certificate

   certutil -setreg ca\ValidityPeriodUnits 10

4. Restart Active Directory Certificate Services 

5. After you do that restart the Active Directory Certificate Services service.  Now you’re ready for the next step, which is to create a new template that you can use to issue SSL certs that are good for 10 years.  Start by opening up a new MMC window (Start…Run…mmc.exe) and then add 3 snap-ins:  Certification Authority (for the local computer), Certificates (for the current user), and Certificates (for the local machine).  Once those are added, expand the Certification Authority, right-click on the Certificate Templates node and select Manage:


6. That opens up the Certificate Templates console.  Now, to simplify things you can just copy the existing Web SSL template.  Scroll down the list of certificate templates until you find the named Web Server, right-click on it and select Duplicate Template.   A dialog will pop up where you can set all the attributes that you want certificates based on this template to have.  Here are the minimum changes you should make:

  • General tab:  change the display name to something useful.  In my case I called my SharePoint Hybrid Long Term SSL.  Change the Validity Period to 10 years.

  • Request Handling tab:  check the option to Allow private key to be exported.
You can close the Certificate Templates console now. 

7. You should be back on the original MMC window you opened, so click on Certificate Templates again and this time select New…Certificate Template to Issue:

That will bring up a dialog that lists the certificate templates, and you can select the certificate template you just created.  Most of the hard work is done at this point.

Saturday, March 8, 2014

Enable Hyper-V on Hyper-V server

1. Enable-WindowsOptionalFeature –Online -FeatureName Microsoft-Hyper-V –All -NoRestart
2. Install-WindowsFeature RSAT-Hyper-V-Tools -IncludeAllSubFeature

Monday, February 24, 2014

create mailbox in exchange 2010 for sub domain user

  In root domain controller, insert Exchange 2010 installation CD to d drive then type  d:\setup /preparedomain:xxx.yyy.zzz (your sub-domain)

The Name on the security certificate is invalid or does not match the name of the site

In the CAS role of Exchange Server, Open Exchange Management Shell, input the following:
  1. Set-ClientAccessServer -Identity "servername" –AutodiscoverServiceInternalURI https://owa.exmple.com/autodiscover/autodiscover.xml 
  2. Set-WebServicesVirtualDirectory -Identity "servername\EWS (Default Web Site)" –InternalUrl  https://nlb.nwtraders.msft/EWS/Exchange.asmx 
  3. Set-OABVirtualDirectory -Identity “servername\OAB (Default Web Site)” -InternalURL https://owa.exmple.com/OAB 
  4. Enable-OutlookAnywhere -Server servername -ExternalHostname “owa.example.com” -ClientAuthenticationMethod “NTLM” 
  5. Set-ActiveSyncVirtualDirectory -Identity “servername\Microsoft-Server-ActiveSync (Default Web Site)” -InternalURL https://owa.exmple.com/Microsoft-Server-Activesync

Prevent or Prohibit Server Drives From Being Visible to Users

  To make changes to this policy for one of the seven default values: Start the Microsoft Management Console. On the Console menu, click  Ad...