Thursday, March 26, 2009

Solve Access denied for user 'root'@'localhost' (using password: NO) in MySQL

# /etc/init.d/mysql stop# mysqld_safe --user=mysql --skip-grant-tables --skip-networking &
# mysql -u root mysqlmysql> UPDATE user SET Password=PASSWORD('newpassword') where USER='root';mysql> FLUSH PRIVILEGES;mysql> quit
# /etc/init.d/mysql restart
# mysql -uroot -pEnter password: mysql>

Tuesday, March 24, 2009

Install Joomla 1.5

1. Install a CentOS 5.1 with minimum component

2. Install Apache, PHP and mySQL by using yum:

yum -y install httpd php mysql mysql-server php-mysql php-mbstring libmcrypt php-mcrypt

3. Download phpMyAdmin from http://www.phpmyadmin.net/home_page/downloads.php to /tmp

4. unzip the zip file

5. move the file to /var/www/html

mv ./phpMyAdmin-2.11.9.4-all-languages /var/www/html/phpMyAdmin

6. start httpd and mysqld

7. copy config.sample.inc.php to config.inc.php

cp ./config.sample.inc.php ./config.inc.php

8. Edit the config.inc.php in following line

$cfg['blowfish_secret'] = ' xxxxxxx'; where xxxxx is a string

9. change the password of mysql

mysqladmin -u root password ‘xxxxx’ where xxxxx is a the password of mysql admin

10. Create a folder mkdir /var/www/html/Joomla

11. Download Joomla to the folder Joomla

12. unzip the file

13. Open a browser in a same network

http://xxxx.xxxx.xxxx.xxxx/Joomla where xxxx.xxxx.xxxx.xxxx is the IP of the Joomla server

14. Follow the screen to install the Joomla

15. Ignore the warning of configuration.php during pre-check

16. create a file called configuration.php with blank content
17. After install Joomla, copy the content and copy to the configuration.php in /var/www/html/Joomla

Monday, March 23, 2009

CentOS用yum安裝php+mysql+apache

1. 安裝Apahce, PHP, Mysql, 以及php連接mysql庫組件。
yum -y install httpd php mysql mysql-server php-mysql php-mcrypt
2. 配置開機啓動服務
/sbin/chkconfig httpd on [設置apache服務器httpd服務開機啓動] /sbin/chkconfig –add mysqld [在服務清單中添加mysql服務] /sbin/chkconfig mysqld on [設置mysql服務開機啓動]
/sbin/service httpd start [啓動httpd服務,與開機啓動無關] /sbin/service mysqld start [啓動mysql服務,與開機無關]
3.設置mysql數據庫root帳號密碼。
mysqladmin -u root password ‘newpassword’ [引號內填密碼]
4. 讓mysql數據庫更安全
mysql -u root -p
mysql> DROP DATABASE test; [刪除test數據庫]mysql> DELETE FROM mysql.user WHERE user = ”; [刪除匿名帳戶]mysql> FLUSH PRIVILEGES; [重載權限]
5. 按照以上的安裝方式, 配置齣來的默認站點目錄為/var/www/html/新建一個php腳本:
6. 新建一個數據庫﹐添加一個數據庫用戶﹐設置用戶權限。寫個php腳本測試一下數據庫連接吧。
mysql> CREATE DATABASE my_db;mysql> GRANT ALL PRIVILEGES ON my_db.* TO ‘user’@'localhost’ IDENTIFIED BY ‘password’; //安裝apache擴展yum -y install httpd-manual mod_ssl mod_perl mod_auth_mysql//安裝php的擴展yum install php-gdyum -y install php-gd php-xml php-mbstring php-ldap php-pear php-xmlrpc//安裝mysql擴展yum -y install mysql-connector-odbc mysql-devel libdbi-dbd-mysql

Wednesday, March 11, 2009

Removing a Failed DC from Active Directory

Hardware fails, hopefully not often, but what do you do if one of your DC's dies? Well it is easy enough to replace the server, reinstall the OS and promote it to a DC, but what about the old DC? Well it will have to be removed from Active Directory and it will have to be done manually, but have no fear, its not that difficult! But first a warning! Caution: The administrator must also make sure that replication has occurred since the failure before manually removing the NTDS Settings object for any server. Using the Ntdsutil utility incorrectly may result in partial or complete loss of Active Directory functionality.
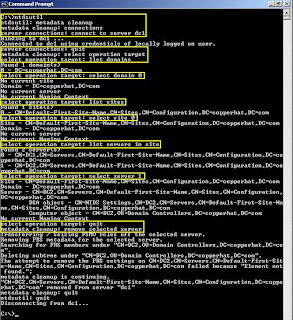
With that out of the way you will need two tools to perform this, ntdsutil which is included in the OS and ADSIEdit.msc which is part of the Support Tools package. We will start with ntdsutil, so open up a command prompt and type the following ntdsutil: metadata cleanup: connections server connections: connect to server {servername of an existing DC server connections:quit metadata cleanup: select operation target select operation target: list domains select operation target: select domain {domain number select operation target: list sites select operation target: select site {site number} select operation target: list servers in site select operation target: select server {server number of DC to be removed select operation target: quit metadata cleanup: remove selected server At this point you will receive a warning message, ensure you have selected the correct server and then select yes to have the server removed. At this time the server will be removed, once complete type quit to leave metadata cleanup and type quit again to exit ntdsutil.


Once you have deleted the DC, there are a few things to check to make sure it is gone completely. Open up the DNS Management MMC and verify the DNS records have been deleted, if not delete them. From a command prompt run ADSIEdit.msc. Expand the Domain [DC.domain.com] container and drill down to DC=Domain, DC=COM and then expand the OU=Domain Controllers folder. If an entry exists for the old DC, delete it. Go back up the tree to the Domain [DC.domain.com] container, and then locate the CN=System folder, expand CN=File Replication Service and then expand CN=Domain System Volume (SYSVOL) and if the old DC is still listed here, delete it.
Open up Active Directory Users and Computers and drill down to the Domain Controllers OU, if the old DC computer record still exists, delete it from here. Finally open up Active Directory Sites and Services and drill down to Sites Default First Site Name Servers and delete the record for the old DC if one still exists.

Wednesday, March 4, 2009

MYSQL跟phpMyAdmin 的安裝

因為最近公司新的主機需要使用mysql還有讓開發人員便於管理的phpMyAdmin所以便研究了一下MYSQL跟phpMyAdmin
一開始想說使用偉大的yum來安裝,但是卻不是那麼順利
1.yum可以安裝mysql沒問題2.CentOS5.2的yum沒有phpMyAdmin,如果Fedora就可以用yum安裝phpMyAdmin
好現在從頭一步一步來講解怎麼做安裝 MySQL+phpMyAdmin1.#yum install mysql-server mysql php-mysql php-mbstring libmcrypt php-mcrypt
2.到phpMyAdmin網頁下載最新的套件http://www.phpmyadmin.net/home_page/index.php將下載回來的tar檔解開#tar zxvf phpMyAdmin-2.11.8.1-all-languages.tar.gz再將解壓縮的資料夾改名並移動到網頁的根目錄(預設為/var/www/html)#mv ./phpMyAdmin-2.11.8.1-all-languages /var/www/html/phpMyAdmin
設定再來就是將剛剛安裝好的與phpMyAdmin做個簡單的設定mysql安裝完最重要的就是將mysql內的管理者帳號root設定密碼等會登入phpMyAdmin時就需要這帳號與密碼.
MYSQL先將mysql的服務啟動#chkconfig mysqld on#service mysqld start
以下範例為將預設的空密碼改為"my1234"#mysqladmin -u root password my1234如果你是要將舊密碼改為"my1234"#mysqladmin -u root -p password my1234Enter password: <==這裡請輸入舊的密碼 phpMyAdmin先到phpmyadmin的目錄裡面#cd /var/www/html/phpMyAdmin產生config.inc.php設定檔預設是沒有這個檔案的,要先將config.sample.inc.php複製成config.inc.php#cp ./config.sample.inc.php ./config.inc.php將認證方式改為http或是cookie還有修改hostname 如果你要以http認證只要修改2個地方#vi ./config.inc.php$cfg['Servers'][$i]['auth_type'] = 'http'; <==改為http$cfg['Servers'][$i]['host'] = 'example.com.tw'; <==改成你的電腦名稱 如果你要以cookie認證方式那你還要多設一個地方#vi ./config.inc.php$cfg['blowfish_secret'] = 'gtry356dfgejdkv42jnl5'; <==隨便輸入亂數的字讓cookie做密碼加密演算,最多46個字$cfg['Servers'][$i]['auth_type'] = 'cookie'; <==改為cookie$cfg['Servers'][$i]['host'] = 'example.com.tw'; <==改成你的電腦名稱 做完以上2個設定就完成了因為之前有安裝一些php的套件,所以要重起httpd#service httpd restart到瀏覽器輸入以下網址http://localhost/phpMyAdmin/使用mysql的root與密碼就可以登入phpMyAdmin管理MYSQL了

Prevent or Prohibit Server Drives From Being Visible to Users

  To make changes to this policy for one of the seven default values: Start the Microsoft Management Console. On the Console menu, click  Ad...