Saturday, April 16, 2011

Offline Address Book: Mystery of The Missing Recipients

Offline Address Book: Mystery of The Missing Recipients

by Bharat Suneja on February 1, 2007
Frequently users report recipients missing from the GAL. So begins the mystery of missing recipients.
These are existing users, not new ones. New users don’t show up in the GAL for clients using Outlook 2003 Cached Mode clients, because Outlook uses an Offline Address List (aka “Offline Address Book” or OAB), which is generated once every 24 hours by default [read previous post "New user does not show up in GAL"]
In this case there are existing users who did show up in the GAL earlier but have disappeared now.
Scenario:
- Recipients are not hidden from Exchange Address Lists
- Recipients do show up in the “All Users” Address List
- Recipients do show up when Outlook’s not in Cached Mode
- Recipients resolve in Outlook Web Access
Some recipients may not be included in the Offline Address Book when it is generated, for a number of reasons.
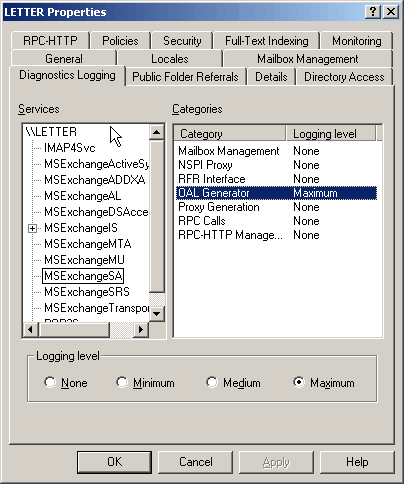
With Diagnostics Logging for OALGenerator bumped up (in server properties | Diagnostics Logging tab | MSExchangeSA -> screenshot), the OAB was regenerated manually. Sure enough, errors were logged for the missing users.
Details:
Event Type: Error
Event Source: MSExchangeSA
Event Category: OAL Generator
Event ID: 9325
Date: 1/30/2007
Time: 3:04:17 PM
User: N/A
Computer: LETTER
Description:
OALGen will skip user entry ‘Joe Adams‘ in address list ‘\Global Address List’ because the SMTP address ” is invalid.
- Default Offline Address List
On closer inspection:
- The reason these recipients show up in the “All Users” Address List is because that Address List is not part of the OAB – only the Default GAL is, as shown in the screenshot below. Therefore, if you disconnect the client from the network, you can’t see the “All Users” Address List.
Default Offline Address List properties
- The default SMTP email address of the user – as displayed on the Email Addresses tab with uppercase SMTP: was jadams@exchangelabs.net.
Recipient Properties - Email Addresses tab
However, on the recipient’s properties | General tab, it showed up as Joe.Adams@exchangelabs.net.
Recipient Properties - General tab
- The address on the General tab was corrected to match the default email address – jadams@exchangelabs.net
- The OAB was regenerated, and complete OAB downloaded in the Outlook client.
VoilĂ , the missing users showed up!
And thus was solved the mystery of the missing recipients.

Tuesday, March 29, 2011

Error message when you try to set an IP address on a network adapter

  1. Click Start, click Run, type cmd.exe, and then press ENTER.
  2. Type set devmgr_show_nonpresent_devices=1, and then press ENTER.
  3. Type Start DEVMGMT.MSC, and then press ENTER.
  4. Click View, and then click Show Hidden Devices.
  5. Expand the Network Adapters tree.
  6. Right-click the dimmed network adapter, and then click Uninstall.

Wednesday, February 9, 2011

Install Centos 5.5 in Hyper-V

Hyper-V R2 brings some powerful virtualization to the table for those of us who do not have either the skills or the desire to work with virtual machineware. Most fans of Hyper-V are also likely to be well versed in Windows and may often lack the knowledge to rummage through Linux. Although there are many resources available regarding Linux on Hyper-V, I felt that most assumed the reader had intimate knowledge with Linux, which is often not the case.
For Windows administrators new to Linux who wish to provide virtualized services to their end-users, my recommendation is to stick to CentOS 5.5. Being a close derivative of Red Hat Enterprise Linux (RHEL), the officially supported distribution by Microsoft, installation of the Integration Components is simplified and stability is matched to what is found when running RHEL.

Requirements

You will need the CentOS 5.5 x64 installation DVD ISO (CentOS-5.5-x86_64-bin-DVD-1of2.iso) which can be found at http://isoredirect.centos.org/centos/5/isos/x86_64/.
You will also need the Linux Integration Services 2.1 ISO (LinuxIC v21.iso) available through the Microsoft Download Center at http://www.microsoft.com/downloads/en/details.aspx?FamilyID=eee39325-898b-4522-9b4c-f4b5b9b64551.

Initial virtual machine Settings

To create the initial virtual machine, you will need to use the Legacy Network Adapter and limit yourself to a single CPU. You will also want to take time to decide how large of a VHD to allocate ahead of time as expanding a Linux partition can be a little complicated. Personally, I find 20GB to be sufficient for small, single purpose Linux virtual machines.

Installing CentOS 5.5

After booting from the CentOS ISO, you are presented with the choice to do a graphical or a text mode installation. To choose the text mode installation (as used here), simply type “linux text” at the boot: prompt and hit enter.

To navigate throughout the next portion of the text mode installation, use the Tab key to navigate between fields and the Space key to select options or hit buttons.
You will be asked if you would like to do a media test. You can safely skip this.

The initial welcome screen to the installation process.

Choose your language as appropriate.

And your keyboard.

You must then partition your VHD for Linux. As you will be starting off with a fresh VHD, you can simply choose “Use free space on selected drives and create default layout.” and continue with OK.

Be sure to hit No to continue as hitting Yes will simply bring you back to the previous screen.

As long as you have properly configured your virtual machine to use the Legacy Network Adapter, you will be presented with the opportunity to have the installation configure it for you.

Check the “Enable IPv4 support” option and hit OK to continue.

Switch to the “Manual address configuration” option and enter your IP address and netmask as appropriate.

Continue on by entering your default gateway (usually your router or your network’s default route). If you have internal DNS servers for your network, enter them here or alternatively, you can use OpenDNS.

The name of your virtual machine is defined here as the hostname.

Select your time zone and continue.

Be sure to choose a secure root password as the root user has complete access to the entire virtual machine and SSH is enabled on first boot.

For a bare minimum installation, uncheck all of the packages, check “Customize software selection” and hit OK.

Uncheck all package groups and continue. Anything you require can later be installed by yum anyway.

Installation will begin once you continue past this screen.

Once installation is complete, you will be required to reboot.

After rebooting, you will be ready to login. At this point, I recommend connecting via SSH in order to copy and paste commands.

Preparing to install the Linux Integration Components

The first thing that must be done is to update all the base packages and upgrade the kernel to the latest version. Simply run a “yum update”, then reboot.
1
2
yum update
reboot
You will need to install the required “kernel-devel”, “gcc”, “make” and “perl” packages to compile and install the Linux Integration Components. Also, I suggest installing the VIM text editor.
1
2
3
4
5
yum install kernel-devel
yum install gcc
yum install make
yum install perl
yum install vim-enhanced.x86_64

Installing the Linux Integration Components

Attach the Linux Integration Services ISO. Once attached, you will need to mount the cdrom. You must then copy and compile the source in a temporary folder. Finally, you will be able install the Linux Integration Components. “make” will compile the source, then “make install” will install the compiled drivers.
1
2
3
4
5
6
7
mkdir -p /mnt/cdrom
mount /dev/cdrom /mnt/cdrom
cp -rp /mnt/cdrom /opt/linux_ic
umount /mnt/cdrom
cd /opt/linux_ic
make
make install
The time synchronisation component is not compatible with CentOS, therefore you will need to install “adjtimex”.
1
yum install adjtimex
You will need to shutdown the virtual machine in order to enable the Synthetic Network Adapter and increase the number of CPUs allocated. To do so, run the shutdown command.
1
shutdown -h -t 0 0
Change the settings in Hyper-V once the virtual machine has completely shutdown.

Start the virtual machine and log in. You will need to reconfigure the network adapter as “eth0″ will have disapeared and a new adapter, “seth0″, will have taken its place.
The easiest way to do this is to edit the MAC address in the “eth0″ backup file to match the MAC address of the Network Adapter as displayed in the virtual machine settings in Hyper-V, then copy the backup file as “seth0″ and restart the network service. Don’t forget to also update the DEVICE line use “seth0″.
1
2
3
4
5
6
vi /etc/sysconfig/network-scripts/ifcfg-eth0.bak
(edit DEVICE and HWADDR)
(save and exit)
rm -f /etc/sysconfig/network-scripts/ifcfg-seth0
mv /etc/sysconfig/network-scripts/ifcfg-eth0.bak /etc/sysconfig/network-scripts/ifcfg-seth0
service network restart
If all went well, you will find yourself with a bare minimum install of CentOS 5.5 running the latest kernel and version 2.1 of the Linux Integration Services. Fully virtualized and synthetic. You can now enjoy the many benefits of Hyper-V Linux such as the ability to shutdown the virtual machine without the root password.

Slove Error Message in Lunix on Virtual machine

TSC appears to be running slowly. Marking it as unstable
Time: pit
clocksource has been installed
Add "clock: pit" to /boot/grub/menu.lst

Tuesday, January 4, 2011

Friday, December 31, 2010

Add SSL to CentOS

1. #install ssl realted program
yum install mod_ssl openssl
 
2. # generate private key
openssl genrsa -out ca.key 1024 

3. # generae CSR from private key
openssl req -new -key ca.key -out ca.csr

4. # generate self assign certificate
openssl x509 -req -days 365 -in ca.csr -signkey ca.key -out ca.crt

5. # Copy file to appropiate location
cp ca.crt /etc/pki/tls/certs
cp ca.key /etc/pki/tls/private/ca.key
cp ca.csr /etc/pki/tls/private/ca.csr
 
6. #Edit Apache SSL configuration file
vi +/SSLCertificateFile /etc/httpd/conf.d/ssl.conf
 
7.#Edit following lines 
SSLCertificateFile /etc/pki/tls/certs/ca.crt
SSLCertificateKeyFile /etc/pki/tls/private/ca.key
 
8. #Restart Apache server
service httpd restart
 
9. #create directory for SSL virtual host
cd /var/www
mkdir html
cd /var
mkdir www-ssl
cd www-ssl
mkdir html

10. # To configure HTTPS over port 443 
vi /etc/httpd/conf.d/ssl.conf

11. # Example HTTPS  configuration

     SSLEngine on
     SSLCertificateFile /etc/pki/tls/certs/ca.crt
     SSLCertificateKeyFile /etc/pki/tls/private/ca.key
   
     AllowOverride All
   
     DocumentRoot /var/www-ssl/html
     ServerName FQDN of web server


12. #Restart Apache server
service httpd restart
 
13. #Put html file to /var/www-ssl/html


Sunday, December 19, 2010

Prevent or Prohibit Server Drives From Being Visible to Users

  To make changes to this policy for one of the seven default values: Start the Microsoft Management Console. On the Console menu, click  Ad...